Connect to SAN via ISCSI from Linux Ubuntu, Debian

First

You must install the open-iscsi package

apt-get install open-iscsi

Second

Configure the software by editing the /etc/iscsi/iscsi.conf file accordingly

If you do not require authentication there are no reasons to edit that file.
if you do follow the this link below:
http://www.cyberciti.biz/tips/rhel-centos-fedora-linux-iscsi-howto.html
Also i like to change the initiator name location /etc/iscsi/initiatorname.iscsi
change the name and restart the open-iscsi service accordingly.

Third

Start the service

/etc/init.d/open-iscsi status
/etc/init.d/open-iscsi start

Fourth

Now you have to discover the targets
First verify that there are no running sessions:

iscsiadm -m session -o show

The output should be: “iscsiadm: No active sessions.”

iscsiadm -m node -o show 

The output should be: “iscsiadm: no records found!”
Good! Now it is time to create a session:

iscsiadm -m discovery -t sendtargets -p 10.X.X.X

Fifth

Now you must login in in order to see the new block device:

iscsiadm -m node --login

Sixth

Verify that the new partition has been created:

cat /proc/partitions

Seventh

Now format the new block device by running the following command:

mkfs.ext3 /dev/sdX 

Eighth

Mount The new partition to a folder within /mnt or anywhere else you want to put it:

mkdir /mnt/iscsi_folder
mount /dev/sdX /mnt/iscsi_folder

Ninth

Make sure that open-iscsi is turn on at boot time

update-rc.d open-iscsi defaults

Make sure that you mount the the drive automatically at boot time:

vi /etc/fstab
/dev/sdX   /mnt/iscsi_folder    ext3    defaults    0    0

Tenth

Automate Target Logins, open /etc/iscsi/iscsi.config and edit the node.startup line to reflect the following:

node.startup = automatic

Useful Web sites
http://www.open-iscsi.org/docs/README
http://www.server-world.info/en/note?os=Ubuntu_12.04&p=iscsi&f=2
http://www.cyberciti.biz/tips/rhel-centos-fedora-linux-iscsi-howto.html
http://askubuntu.com/questions/2263/chkconfig-alternative-for-ubuntu-server
http://www.open-iscsi.org/index.html#docs
https://github.com/mikechristie/open-iscsi/blob/master/README

Restore your Start Menu in Windows 8

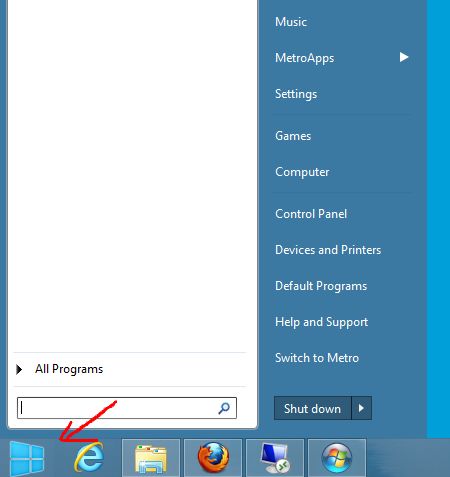
Well, at the time of writing, Microsoft is working diligently to restore the Start Menu in the next version Windows 8 titled (8.1). If you can’t wait until the next version is released, you can easily restore your Start Menu by installing this software by IObit titled “Start Menu 8”.

There may be several other options out there by I prefer this one below:

http://www.iobit.com/iobitstartmenu8.php

Here is how it looks:

start_menu_windows8_ycsoftware

mysqldump export access denied for user (MySQLWorkbench) on Windows

10:14:37 Dumping my_table

Running: "mysqldump.exe" --defaults-extra-file="c:\users\ycsoftware\appdata\local\temp\tmp0v6jpl.cnf"  --no-create-info=FALSE --order-by-primary=FALSE --force=FALSE --no-data=FALSE --tz-utc=TRUE --flush-privileges=FALSE --compress=FALSE --replace=FALSE --host=localhost --insert-ignore=FALSE --extended-insert=TRUE --user=ycsoftware --quote-names=TRUE --hex-blob=FALSE --complete-insert=FALSE --add-locks=TRUE --port=3306 --disable-keys=TRUE --delayed-insert=FALSE --create-options=TRUE --delete-master-logs=FALSE --comments=TRUE --default-character-set=utf8 --max_allowed_packet=1G --flush-logs=FALSE --dump-date=TRUE --lock-tables=TRUE --allow-keywords=FALSE --events=FALSE --databases "my_table"

mysqldump: Got error: 1045: Access denied for user 'ycsoftware'@'localhost' (using password: YES) when trying to connect

Operation failed with exitcode 2

You are trying to export (dump) your database tables and you come across the error message above and you know for sure that you have the proper access.

Solution

The issue is that MySQLWorkbench does not know where the your mysqldump.exe (weird huh!). let’s see how we can point it to the “mysqldump.exe” file.

First

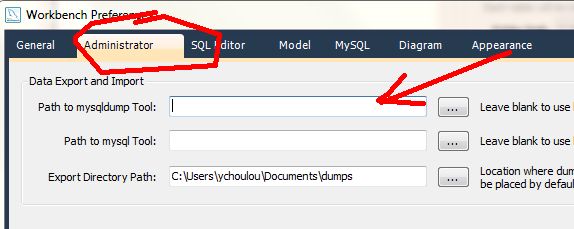
Open MySQLWorkbench and click on “View” menu and Preferences

Second

Go to the administrator tab and browse to the location of you mysqldump.exe, which should be located on your system.

mysql_workbench_mysqldump_access_denied

Third

Try again and voila.